Golang製の静的サイトジェネレータHugoと最近良く名前を聞くホスティングサービスNetlifyで本ブログを作成したときのメモです。
参考
参考というか、まるっとそのままやってます。ありがとうございます。submoduleの部分だけ少し変えました。
NetlifyでHugoで作った静的サイトをホスティングしてビルドを自動化する
localでhostするまで
# install hugo
$ brew install hugo

# check version
$ hugo version
Hugo Static Site Generator v0.49/extended darwin/amd64 BuildDate: unknown

# create new site
$ hugo new site hogehoge-dot-com

$ cd hogehoge-dot-com

# set theme
$ cd theme
$ git clone https://github.com/dim0627/hugo_theme_robust.git

$ cd ../

# create new post
$ hugo new posts/my-first-post.md

# edit post
$ vim content/post/my-first-post.md

# serve on local
$ hugo server --buildDrafts --theme=hugo_theme_robust
gitの設定
git管理下のディレクトリのthemeに対し更にgit cloneしているので、submoduleの設定をする。
また、今回リポジトリのホスティングにはGithubを使ったが、Netlifyはbitbucket / Gitlab も対応しているっぽい。
$ git init
$ git remote add origin https://github/<your-name>/<repo>.git
$ touch .gitmodules
$ vim .gitmodules

$ git add .
$ git commit -m "first commit"
$ git push origin master
.gitmodules
[submodule "themes/hugo_theme_robust"]
    path = themes/hugo_theme_robust
    url = https://github.com/dim0627/hugo_theme_robust.git
Netlify側でGithubへのmaster pushのタイミングでデプロイする設定をする
Netlify側の設定は、
- githubと連携
- ブログのリポジトリを選択
- 静的サイトジェネレータにHugoを使う指定をする
- Hugo用のデプロイのテンプレートを確認して問題なさそうなら完了
で終わりました。
ここはGUIなので難しくない。
参考までに設定済のDeploy Settingが以下のようになる。
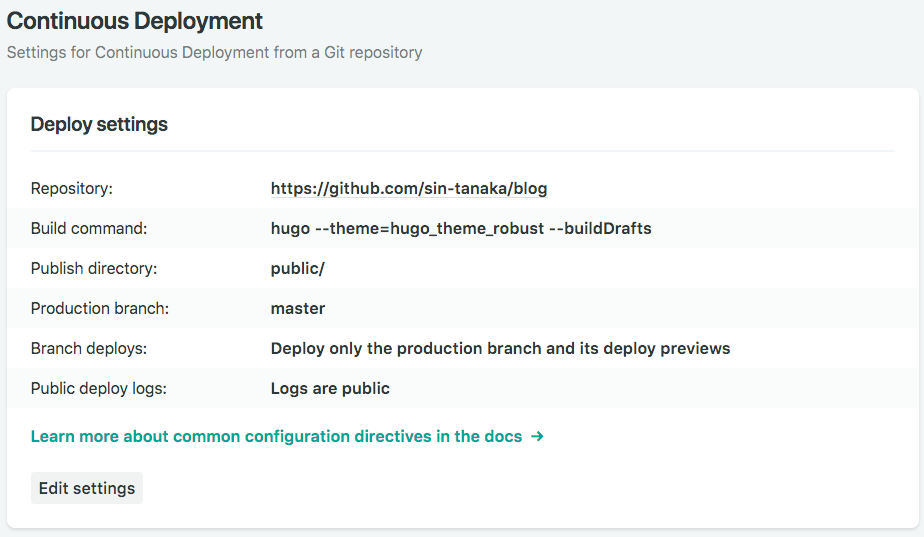
これでGithubのmasterブランチへのpushをトリガーにしてhugoのビルドコマンドが走る。Netlify側ではビルドした生成物である /public ディレクトリをホストする。
著名な静的サイトジェネレータに特化し、めちゃくちゃ設定が簡単はCIといった感じ。とても便利。